Drait 31, 32
Renal 45
Dimensions + technical data Drait 31
Length: 13,50 meters
Width: 4,25 meters
Draft: 1,10 meters
Clearance height: 5,00 meters
Water tank: 900 litres
Waste water tank: 600 litres
Fuel tank: 700 litres
Dimensions + technical data Drait 32
Length: 13,50 meters
Width: 4,25 meters
Draft: 1,10 meters
Clearance height: 4,00 meters
Water tank: 900 litres
Waste water tank: 600 litres
Fuel tank: 700 litres
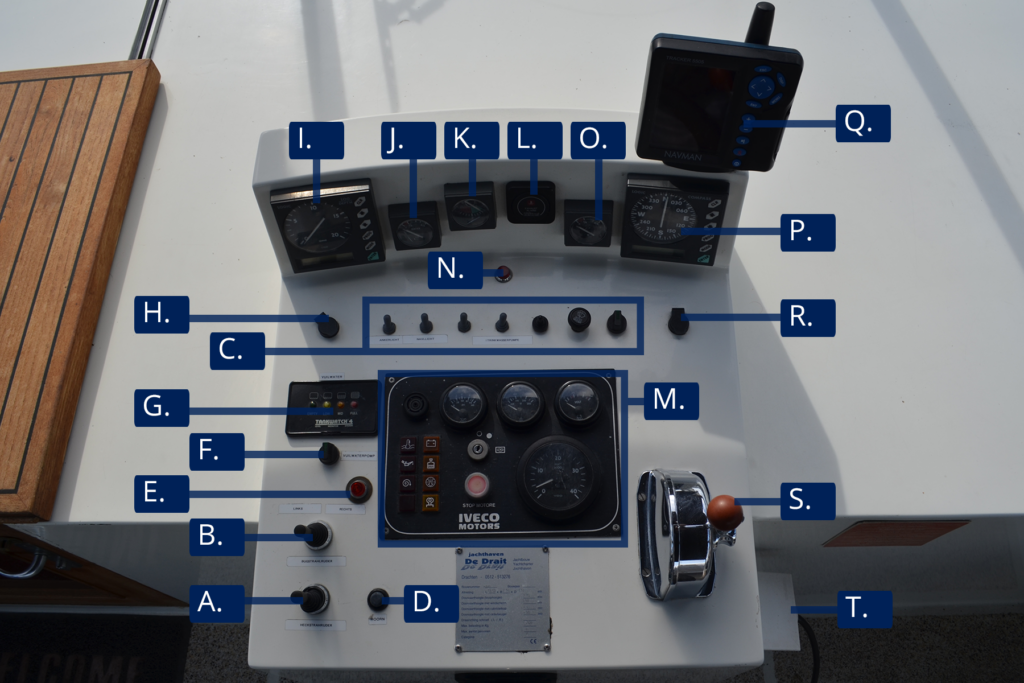
Steering position Drait 31
Steering position
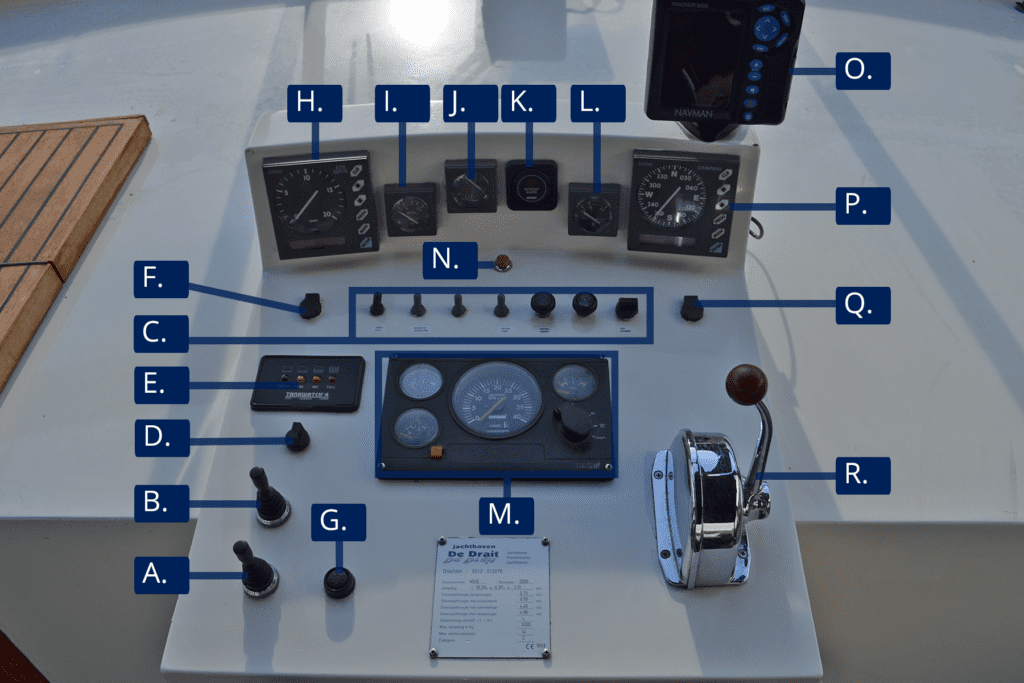
A. Stern thruster
B. Bow thruster
C. Switches (check below)
D. Waste water pump
E. Waste water tank
F. 12/24 Volt
G. Horn
H. Depth meter
I. Water meter
J. Rudder possition
K. Exhaust alarm
L. Fuel meter
M. Engine panel (check below)
N. –
O. Chart plotter
P. Compass
Q. 12/24 Volt
R. Throttle
Engine panel
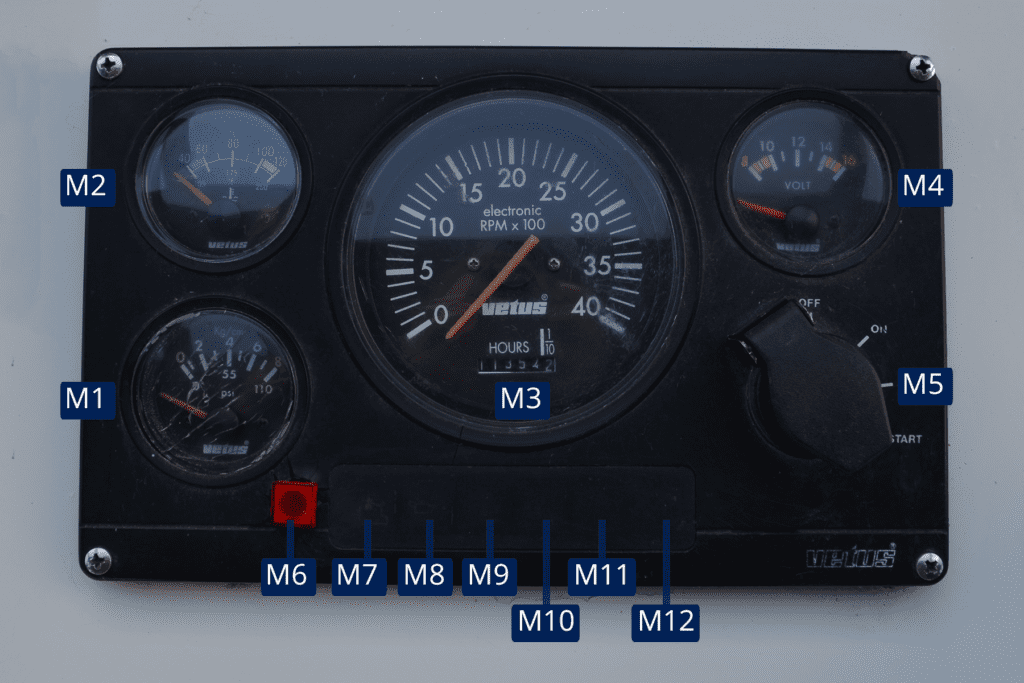
M1. Oil pressure
M2. Engine temperature
M3. Tachomeeter
M4. Battery voltage
M5. Ignition lock
M6. Dynamo check
M7. –
M8. Lubrication oil alarm
M9. Cooling water temperature alarm
M10. Dynamo check
M11. –
M12. –
Switches
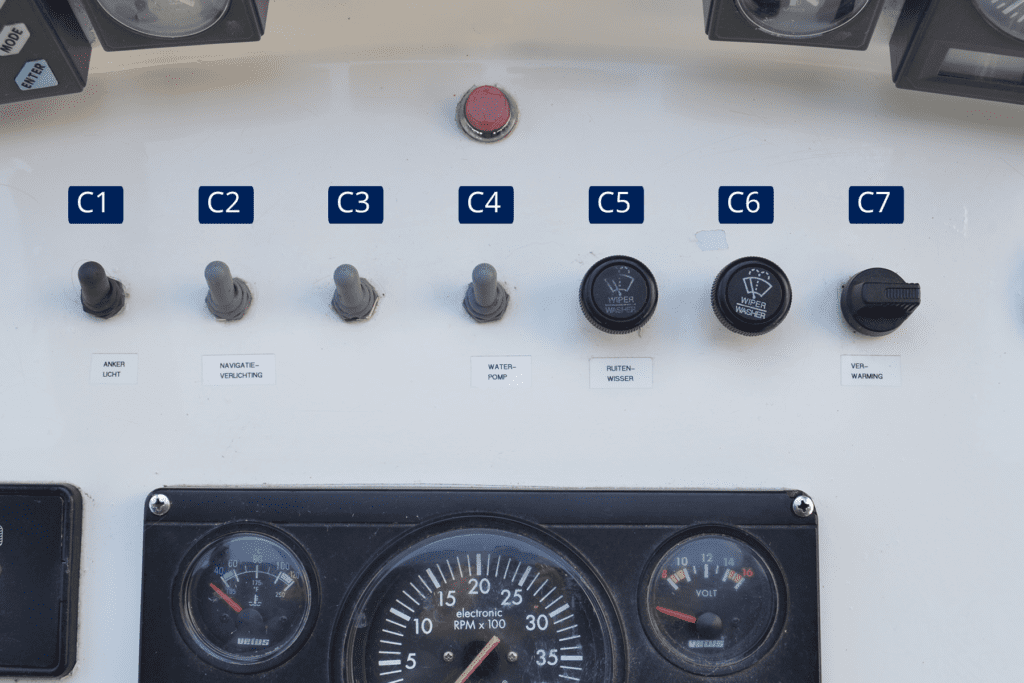
C1. Anchor light
C2. Navigatipn light
C3. –
C4. Water pump
C5 Windshield wiper
C6. Windshield wiper
C7. Heating
Steering position Drait 32
Stuurstand
A. Hekschroef
B. Boegschroef
C. Schakelaars (Volgende pagina)
D. Scheepshoorn
E. Dynamo controle
F. Vuilwaterpomp
G. Vuilwatertank
H. 12/24 Volt
I. Dieptemeter
J. Watermeter
K. Roerstand
L. Uitlaat alarm
M. Motorpaneel (Volgende pagina)
N. Niet in gebruik
O. Brandstofmeter
P. Kompas
Q. Kaartplotter
R. 12/24 Volt
S. Gashendel
T. Aansluiting walstroom
Motorpaneel
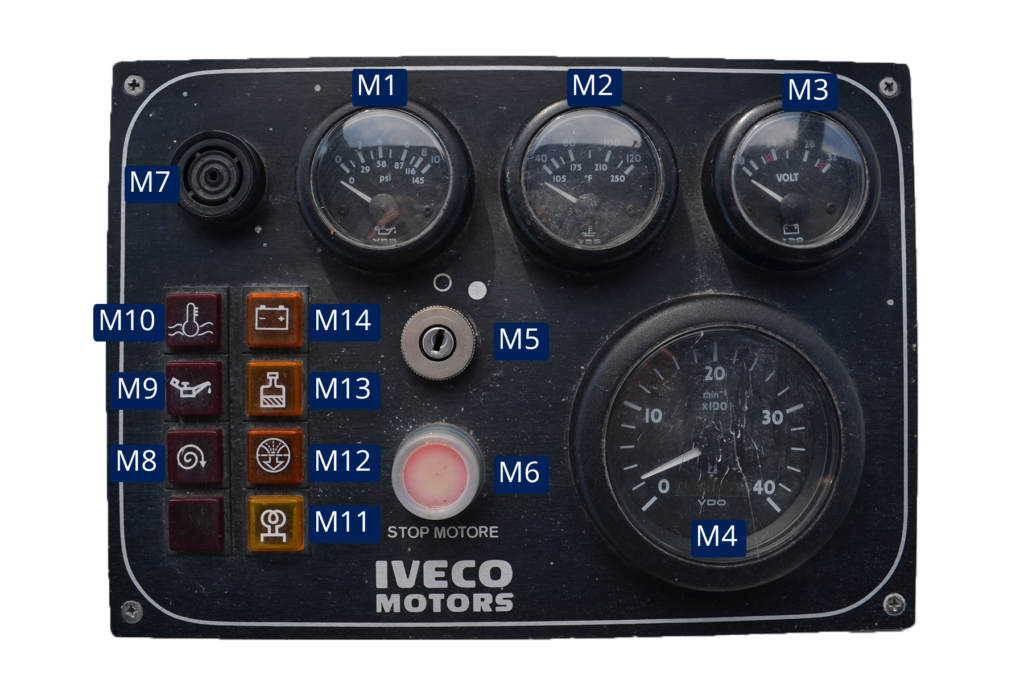
M1. Oliedruk
M2. Motortemperatuur
M3. Accuspanning
M4. Toerenteller
M5. Contactslot
M6. Motor stop
M7. Alarm speaker
M8. –
M9. Smeeroliedruk alarm
M10. Koelwatertemperatuur alarm
M11. Voorgloeien
M12. –
M13. –
M14. Dynamo controle
Schakelaars
C1. Anchor light
C2. Navigatipn light
C3. –
C4. Water pump
C5. –
C6. Windshield wiper
C7. Heating
Start and stop the engine Drait 31
Starting the engine
Make sure the throttle lever is in the neutral position. Insert the key into the ignition and turn the key until the engine starts.
Throttle lever
Neutral: middle position
Forward: push forward
Reverse: pull backward
Tip: Pause briefly (1–2 seconds) when shifting between forward, neutral, and reverse.
Stopping the engine
Turn the key in the ignition back until the engine stops.
Start and stop the engine Drait 32
Motor starten
Zorg ervoor dat de gashendel in neutraal staat. Steek de sleutel in het contactslot en draai de sleutel om totdat de motor is gestart.
Gashendel
Neutraal: middenpositie
Vooruit: naar voren
Achteruit: naar achteren
Tip: Houd een korte pauze (1-2 seconden) tussen het schakelen van de vooruit, neutraal en achteruit.
Motor stoppen
Druk op de stopknop totdat de motor is gestopt en draai vervolgens de sleutel in het contactslot terug.
Bow and stern thruster
This boat is equipped with an electric bow and stern thruster. This means that both the bow and stern thrusters are powered by separate batteries. The bow and stern thrusters only work when the engine is running. You do not need to activate the thursters with a switch, they are active as soon as the engine is running. Use the bow or stern thruster only for maneuvering.
Using the electric bow and stern thruster
When you move the bow thruster joystick to the left, the front of the boat moves to the left. When you move the joystick to the right, the front of the boat moves to the right. The same applies to the stern thruster, but it moves the back of the boat. Use the bow or stern thruster for about 3 seconds at a time (maximum 5 seconds per use!). Observe how the boat responds. If necessary, use the thruster again for 3 seconds. Repeat this process until the desired position is reached. Do NOT use the bow and stern thruster at the same time. This causes power loss and will make maneuvering slower. Alternate their use for the best result.
What to do if the bow or stern thruster doesn’t work?
Excessive use of the bow or stern thruster can cause the system to overheat, making it temporarily non-functional. Wait approximately 30 minutes before trying again.
Still not working? The battery is likely empty. Moor the boat and connect it to shore power. Allow it to charge overnight (or at least several hours). Still having issues? Please contact us at +31 512 513 276.
Power supply
The boat has multiple batteries:
-A battery for starting the engine (starter battery);
-A battery for the bow and stern thrusters (except in the case of hydraulic thrusters);
-A battery pack for onboard power (house batteries).
While cruising, the batteries are slowly recharged. However, charging is much faster when the boat is connected to shore power. Therefore, if the battery voltage is low, we recommend finding a berth with a shore power connection.
It is generally possible to spend one night without a shore power connection, but we advise connecting the boat to shore power the following night.
In the salon, you’ll find a control panel for the inverter (Victron Energy, see photo). Make sure the inverter is always set to ‘on’. There is also a rotary knob to adjust the number of Amps. This is usually set between 8 and 12 Amps by default. It’s important that the Amp setting is equal to or lower than the number of Amps available at the shore power connection.
For example, if a marina provides 12 Amps at the power pedestal, you can set the knob to 12. If the knob is set higher than the available shore power, the fuse may trip. In that case, reduce the Amp setting and reset the fuse.

What to do if there is no power on board?
Check the power supply on board at the fuse box (located in the salon). Check the indicator lights for 230V via the inverter and 230V via shore power. Also check if any fuses in the fuse box have tripped. No indicator light? Check if the power outlets are working and whether the fridge is still running. If these also have no power, the battery voltage is likely too low, and you should first connect the boat to shore power so the batteries can recharge.
If the boat is connected to shore power, check if it is actually charging. Some boats are equipped with a battery monitor in the salon, which can be used to check whether the batteries are being charged. You can also verify this on the inverter panel or by checking the indicator lights in the fuse box. Not sure if the batteries are being charged? Try plugging the shore power cable into a different outlet. If in doubt, ask the harbor master to check whether the power pedestal is supplying electricity.
- Check the inverter control panel in the salon:
Skyla control – Victron Energy:
–Charger on = Shore power is connected and the batteries are charging.
–Boost charging = Battery voltage is low, charging at full power.
–Float charging = Batteries are charged, being maintained/trickle charging.
Digital Multi Control – Victron Energy:
–Mains on = Shore power is connected and batteries are charging.
–Bulk = Battery voltage is low, batteries charging at full power.
–Absorption = Battery voltage is higher (80–90%), still charging.
–Float = Batteries are charged and being maintained/trickle charging.
–Inverter on = Inverter is active because shore power is not connected.
–Overload = Batteries are overloaded due to high power consumption.
–Low battery = Batteries are deeply discharged; this light stays on if shore power is not connected properly.
–Temperature= Batteries are getting hot; often lights up along with overload. - If there are no lights on the inverter panel, check the inverter switch in the fuse box. Is it off? Switch it on. Is it already on? Switch it off, wait one minute, then switch it back on. This will reset the inverter.
- If none of the above helps, please contact us at +31 512 513 276.
Heating
The central heating (CV) on this boat runs on diesel. In addition, sufficient electrical power is required for the system to function properly. There is a thermostat in the salon, which you can use to set the desired temperature. Make sure the radiator valves in the cabins are open so they can also heat up.
Important: Always check that no fenders are hanging in front of the heater exhaust before turning the heater on.
This boat is equipped with a Maritime Booster heater, which provides both hot water and central heating.
What to do if the heater doesn’t work?
Check the power supply on board at the fuse box (in the salon). Check the indicator lights for 230V via the inverter and 230V via shore power. Also check whether any fuse has tripped in the fuse box (often marked with a sticker labeled ‘CV’). No indicator light? Check if the power outlets are working and whether the fridge still has power. If there’s no power there either, the battery voltage is likely too low, and you should connect the boat to shore power so the batteries can recharge. Still not working after charging? Check the heater unit in the engine room. Open the engine hatch and locate the blue box labeled ‘Maritime Booster’. Press the red button on the front of the unit to reset the heater. Wait a few seconds to hear whether the heater restarts. Still having issues? Please contact us at +31 512 513 276.
Toilet
The boat is equipped with an electric toilet. Normal use of toilet paper (maximum 2-ply) is not a problem. However, always flush well to prevent it from getting stuck in the pipes. Do not throw wet wipes, sanitary pads, and/or tampons into the toilet! This can cause blockages.
How does the toilet work?
The toilet has two buttons. In most cases, these buttons are labeled ‘before use’ and ‘after use’. For a small flush, it is sufficient to flush using ‘after use’. For a larger flush, you should first press ‘before use’ so that a layer of water is already in the bowl. After using the toilet, press the ‘after use’ button. After use, a small amount of clean water remains in the bowl to prevent unpleasant odors.
What to do if the toilet does not work?
First check whether the fuse for the toilet is still switched on in the fuse box in the salon. Isn’t the water pumping away? Then the toilet is likely blocked. Wait approx. 12 hours before using the toilet again, so the blockage has time to soak. Then press ‘after use’ once more. If the toilet still does not work, please contact us at +31 512 513 276. If the blockage is caused by incorrect use of the toilet, charges may apply.
TV + radio
There is a TV with an antenna on board. This allows you to receive channels such as NPO 1, NPO 2, NPO 3, and regional stations.
How does the TV work?
1. Does the boat have a fixed antenna? Then you don’t need to do anything in this step. If the boat has a portable antenna, place it in the wheelhouse near the access hatch for the best reception.
2. Then switch on both the TV and the antenna receiver using their remote controls.
3. Check that the TV is set to HDMI.
4. A channel number will appear on the antenna receiver, and the image should now appear on the TV.
5. Use the antenna remote control to switch between channels.
What to do if the TV doesn’t work?
Check whether the issue is with the antenna reception, and try placing the antenna elsewhere. Also check if all the cables are properly connected: the TV’s plug in the power socket and the satellite receiver plug in the HDMI port. If you still experience problems with the TV, please contact us at +31 512 513 276.
Radio
There is a car radio on board. You can switch on the radio using the ‘on’ button and then use it as desired. Please make sure not to cause noise disturbance.
Info above deck
Checking the cooling water from the exhaust
The boat is equipped with a water-cooled engine. This means that water from outside is used to cool the engine. Therefore, it is important to always check if cooling water is coming out of the exhaust. Is there no or very little cooling water coming from the exhaust? Pull the throttle lever sideways to enable revving in neutral. Give a little gas with the throttle and check if this increases the amount of cooling water. Don’t forget to return the lever to neutral and click it back into place so the throttle can be used normally again. Did this not have the desired effect? Turn off the engine as soon as possible to prevent overheating and call +31 512 513 276 immediately.
Has a crew member of De Drait instructed you to check the weed filter? Follow these steps:
Open the engine hatch in the salon;
Locate the weed filter(s) connected to the engine and carefully unscrew the cap.
Note: There is a rubber ring between the cap and the filter housing – do not lose it!Remove the filter and clean it using outside water or at a water point in the marina;
Place the cleaned filter back, along with the rubber ring and cap.
Make sure the cap is sealed airtight;Start the engine and check if cooling water is now coming out of the exhaust.
Important: Never take action in the engine room without telephone permission from De Drait. If you have any questions, call +31 512 513 276.
Gas locker
The gas locker is located under the canopy on the aft deck. There are 2 gas bottles here: 1 is connected and 1 is a spare. When you take over the boat, the gas bottle is always connected and open. If the gas bottle is empty, you must replace it yourself.
Replacing the gas bottle:
1. Close the valve of the connected bottle;
2. Loosen the nut of the pressure regulator using the provided wrench (left-hand thread);
3. Connect the pressure regulator to the other gas bottle;
4. Open the valve of the newly connected gas bottle.
Shore power
The shore power cable belongs to this boat. Always make sure to disconnect the shore power cable on shore and bring it on board before departure. Reconnect the shore power cable upon arrival at the marina. Check whether the light ‘Charger on’ or ‘Mains on’ is illuminated on the inverter control panel (in the salon). This indicates that the batteries are being charged. Also check the number of amps available at the power pedestal. Adjust this if necessary on the inverter control panel. If you have any questions, it’s best to ask the harbor master or contact us.
Fenders
The boat has 6–8 fenders. Make sure the fenders are securely attached to the railing to avoid losing them while cruising. Check the ‘Knots’ section under ‘Theory’ to see how to tie the fender using a clove hitch. Questions? Feel free to ask the instructor to demonstrate how to tie the knot.
Make sure the fenders are not hanging in front of the heater exhaust! This can cause exhaust fumes to be drawn back inside, which may lead to carbon monoxide poisoning. The fender may also melt due to the heat.
Boat lines
The boat has 4 lines, one on each corner of the boat (left front / right front / left rear / right rear). Place the loop around the cleat of the boat. Pass the line under the railing to the cleat/ring on the dock/shore. Do not secure the line yet! Bring the line back to the cleat on the boat and secure it with a clove hitch or round turn and two half hitches. Check the ‘Knots’ section under ‘Theory’ for instructions on how to tie these knots. This way, you can easily release the line from the boat without having to stand on the dock. If necessary, you can use the boat hook to assist. Questions? Feel free to ask the instructor to demonstrate how to tie the knots.
Anchor
The anchor winch is located on the foredeck. The bar to operate it can be found in the gas locker. To lower the anchor, loosen the nut with the 3 pins using the bar. This will release the chain wheel, and the anchor will drop. Remember: no fingers near the chain! To raise the anchor, use the same bar but insert it into the hole on the other side of the winch. By moving the bar back and forth, you will lift the anchor. For the final part, it’s best to guide the anchor with the boat hook so that it sits correctly against the anchor plate without causing damage to the hull of the boat. If you are anchored, you should hang the anchor ball in the mast (located in the cabinet in the salon next to the stairs or in the bench on the aft deck). Important: Anchoring is not permitted at dusk or during the night. Make sure to find a mooring in time, such as a Marrekrite spot or in a marina.
Navigation lights
If you are sailing during the day (between sunrise and sunset) with good visibility, you do not need any lights. However, when visibility decreases due to fog, rain, or other weather conditions, it is mandatory to turn on the navigation lights. Use the buttons on the helm to switch the lights on and off.
Refilling water
Halfway along the ship, on the starboard or port side, you will find the cap for the drinking water in the gangway. The water tank has already been filled for you before departure. If you need to refill the water tank during your trip, always let the water run briefly to ensure fresh water comes out of the hose. Place the hose in the filling hole and fill the water tank. If water starts coming out of the vent opening on the side of the ship, or if the water overflows at the fill cap, this means the water tank is full. Although the water tank is filled with drinking water, we advise against drinking it and recommend using bottled water instead. It is also recommended to refill the water tank every 2-3 days.
Vuilwater afzuigen
In het gangboord of op het zwemplateau bevindt zich de dop voor de vuilwatertank. Voor het afzuigen van de vuilwatertank draait u de dop los en draait u de slang van de vuilwaterpomp luchtdicht vast. Het legen van de vuilwatertank duurt gemiddeld 10/15 minuten. Indien de vuilwatertank leeg is, kunt u de slang van de vuilwaterpomp weer loskoppelen en draai de dop van de vuilwatertank weer vast. Bij terugkomst legen wij de vuilwatertank. Indien de tank onderweg vol is, dient u zelf een afzuigstation op te zoeken.
Refilling fuel (GTL)
Halfway along the ship, on the starboard or port side, you will find the cap for the fuel tank in the gangway. This boat runs exclusively on GTL diesel. Regular diesel must not be used for refueling during the trip. The tank is large enough for a two-week journey. Upon your return, we will refuel the boat for you. Please refer to the list of fuel stations along the water, which you will find here.
Tent
Before opening and closing the zippers, check if it’s necessary to relieve some of the tension by loosening the straps. On most boats, the front windows can be rolled up, and the sides and back can be opened. This allows enough fresh air to flow through the tent while maintaining the sunroof. Our advice is NOT to remove the entire tent from the boat. The reason for this is that the tents are often tightly fitted, making it difficult to reattach them properly afterwards. Any damage to the tent/boat caused by incorrect handling against the advice of De Drait is at your own risk.
If it is still necessary to remove the tent, ask our instructor during the briefing what is important to pay attention to, especially when reattaching the tent and the cockpit cover. You must return the boat in the same condition you received it. If the tent/tent parts have been removed, they must be reinstalled upon return.
Service | Questions | Contact
The team members of Team De Drait have done their utmost to prepare the boat for you. However, it’s still possible that an unexpected issue may arise during your boating holiday. If that happens, please first consult the information in the onboard manual. Still have a question or problem after reading the manual? We are always here to help you. Please contact us via:
-Email: contact@dedrait.com
-Phone: +31 512 513 276